Redux Toolkit 튜토리얼 (4)

비동기 로직은 스토어 외부에서 발생해야 한다. 스토어 안에서 비동기 코드를 작성하기 위해서는 미들웨어를 사용해야 하는데 redux toolkit의 configureStore는 기본적으로 thunk 미들웨어를 자동으로 설정한다. 리덕스는 비동기 로직을 작성할 때 thunk를 사용하는 것을 권장한다고 한다.
Thunk
const getRepoDetailsStarted = () => ({
  type: 'repoDetails/fetchStarted',
});
const getRepoDetailsSuccess = (repoDetails) => ({
  type: 'repoDetails/fetchSucceeded',
  payload: repoDetails,
});
const getRepoDetailsFailed = (error) => ({
  type: 'repoDetails/fetchFailed',
  error,
});
const fetchIssuesCount = (org, repo) => async (dispatch) => {
  dispatch(getRepoDetailsStarted());
  try {
    const repoDetails = await getRepoDetails(org, repo);
    dispatch(getRepoDetailsSuccess(repoDetails));
  } catch (err) {
    dispatch(getRepoDetailsFailed(err.toString()));
  }
};
thunk를 직접 작성한다면 코드는 위와 같다. 하지만 redux toolkit의 createAsyncThunk는 action type과 creator를 생성하고 액션을 자동으로 디스패치하는 thunk를 생성하여 추상화시킨다. 또한 비동기 호출을 실행하고 데이터와 함께 프로미스를 반환하는 콜백 함수를 제공한다.
비동기 thunk 코드 작성을 위해 기존 더미 데이터를 json-server로 이동시킨다.
npm i json-server
비동기 요청 로딩 상태
로딩 상태는 크게 4가지로 볼 수 있다.
- idle (요청이 시작되지 않음)
- loading (요청이 진행 중)
- succeeded (요청 성공)
- failed (요청 실패)
{
  status: 'idle' | 'loading' | 'succeeded' | 'failed',
  error: string | null
}
위 타입을 토대로 postsSlice의 initialState를 변경한다. 기존 state는 배열이었지만 객체로 변경하여 로딩 상태와 error를 추가한다. 상태명은 다른 이름을 사용할 수 있다. 또한 {isLoading:true}와 같이 boolean을 사용하여 상태를 추적할 수도 있다.
// features/postsSlice.ts
import { PayloadAction, createSlice, nanoid } from '@reduxjs/toolkit';

const reactions = {
  eyes: 0,
  heart: 0,
  hooray: 0,
  rocket: 0,
  thumbsUp: 0,
};

const initialState: PostState = {
  posts: [],
  status: 'idle',
  error: null,
};

const postsSlice = createSlice({
  name: 'posts',
  initialState,
  reducers: {
    postAdded: {
      reducer(state, action: PayloadAction<Post>) {
        state.posts.push(action.payload);
      },
      prepare(title, content, userId) {
        return {
          payload: {
            id: nanoid(),
            date: new Date().toISOString(),
            title,
            content,
            userId,
            reactions,
          },
        };
      },
    },
    postUpdated(
      state,
      action: PayloadAction<Omit<Post, 'userId' | 'date' | 'reactions'>>,
    ) {
      const { content, id, title } = action.payload;
      const existingPost = state.posts.find((post) => post.id === id);
      if (existingPost) {
        existingPost.title = title;
        existingPost.content = content;
      }
    },
    reactionAdded(state, action: PayloadAction<{ id: string; key: string }>) {
      const { id, key } = action.payload;
      const existingPost = state.posts.find((post) => post.id === id);
      if (existingPost) {
        existingPost.reactions[key as keyof typeof reactions] += 1;
      }
    },
  },
});

export const { postAdded, postUpdated, reactionAdded } = postsSlice.actions;

export default postsSlice.reducer;
createAsyncThunk
redux toolkit의 createAsyncThunk API는 start/success/failure 작업을 자동으로 전송하는 thunk를 생성한다.
createAsyncThunk를 사용하여 json-server에 posts를 요청한다.
// features/postsSlice.ts
// 코드 생략
export const fetchPosts = createAsyncThunk('posts/fetchPosts', async () => {
  const { data } = await axios('http://localhost:4000/posts');
  return data;
});
const postsSlice = createSlice({
  // 코드 생략
});createAsyncThunk는 두 개의 파라미터를 받는다.
- action type
- 데이터가 포함된 프로미스 또는 rejected된 프로미스를 리턴하는 payload creator 콜백 함수
payload creator는 일반적으로 ajax 호출을 수행하며 프로미스를 반환한다.
PostList컴포넌트에서 fetchPosts 함수를 이용하여 data를 가져오자. 다른 dispatch 함수와 사용법은 같다.
import { useEffect } from 'react';
import { useAppDispatch, useAppSelector } from 'hooks';
import { fetchPosts } from 'features/postsSlice';
import PostItem from './PostItem';

export default function PostList() {
  const { error, posts, status } = useAppSelector((state) => state.posts);
  const dispatch = useAppDispatch();

  useEffect(() => {
    if (status === 'idle') {
      dispatch(fetchPosts());
    }
  }, [dispatch, status]);

  return (
    <div className="mt-5 flex flex-col gap-y-5">
      {posts.map((post) => <PostItem key={post.id} post={post} />).reverse()}
    </div>
  );
}dispatch(fetchPosts())를 호출하면 thunk는 먼저 posts/fetchPosts/pending action type을 dispatch 한다.
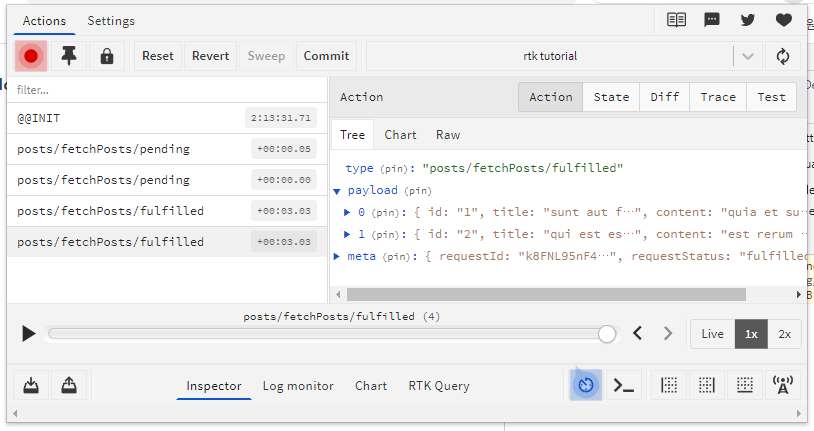
프로미스가 완료되면 fetchPosts thunk는 콜백에서 반환한 data 배열을 가져와 action.payload에 포함하여 posts/fetchPosts/fuifilled 액션을 디스패치한다. dispatch가 두 번 실행되는
이유는 react의 StrictMode 때문이다.
extraReducers
createSlice는 aciton creator와 action type을 자동으로 생성한다. createAsyncThunk로 인해 생성된 action type은 리듀서가 처리하지 못한다. 이때 extraReducers를 사용하면 처리할 수 있다.
// features/postsSlice.ts
const postsSlice = createSlice({
  name: 'posts',
  initialState,
  reducers: {
    // 코드 생략
  },
  extraReducers(builder) {
    builder
      .addCase(fetchPosts.pending, (state, action) => {
        state.status = 'loading';
      })
      .addCase(fetchPosts.fulfilled, (state, action) => {
        state.status = 'succeeded';
        state.posts = action.payload;
      })
      .addCase(fetchPosts.rejected, (state, action) => {
        state.error = action.error.message ?? 'posts request failed';
        state.status = 'failed';
      });
  },
});extraReducers는 builder 매개변수를 받으며 builder 객체는 addCase를 통해 각각의 액션을 처리할 수 있다.
usersSlice 또한 initialState 값을 초기화 시킨 후 기존 데이터를 db.json으로 옮긴다. 그 후 createAsyncThunk를 사용하여 fetchUsers thunk를 추가한다. usersSlice의 상태는 중복적인 데이터 패칭을 막기 위해 status 대신 isSuccess 하나만 추가하였다.
// features/usersSlice.ts
import { createAsyncThunk, createSlice } from '@reduxjs/toolkit';
import axios from 'axios';

const initialState: UserState = {
  isSuccess: false,
  users: [],
};

export const fetchUsers = createAsyncThunk('users/fetchUsers', async () => {
  const { data } = await axios('http://localhost:4000/users');
  return data;
});

const usersSlice = createSlice({
  name: 'users',
  initialState,
  reducers: {},
  extraReducers(builder) {
    builder.addCase(fetchUsers.fulfilled, (state, action) => {
      state.users = action.payload;
      state.isSuccess = true;
    });
  },
});

export default usersSlice.reducer;
// components/posts/PostList.tsx
// 코드 생략
useEffect(() => {
if (!isSuccess) {
dispatch(fetchUsers());
}
}, [dispatch, isSuccess]);
// 코드 생략현재는 게시글을 올리면 서버에 추가되지 않고 내부 상태에만 추가된다. addNewPost thunk를 생성하여 서버에 POST 요청을 해야 한다. body에 id를 추가하지 않은 이유는 jons-server에서 고유 id를 생성하기 때문이다.
// 코드 생략

export const addNewPost = createAsyncThunk(
  'posts/addNewPost',
  async (initialPost: { content: string; title: string; userId: string }) => {
    const { content, title, userId } = initialPost;
    const { data } = await axios.post('http://localhost:4000/posts', {
      title,
      content,
      userId,
      date: new Date().toISOString(),
      reactions,
    } as Omit<Post, 'id'>);
    return data;
  },
);

const postsSlice = createSlice({
  name: 'posts',
  initialState,
  reducers: {
    // 코드 생략
  },
  extraReducers(builder) {
    // 코드 생략
    builder.addCase(
      addNewPost.fulfilled,
      (state, action: PayloadAction<Post>) => {
        state.posts.push(action.payload);
      },
    );
  },
});

export const { postUpdated, reactionAdded } = postsSlice.actions;

export default postsSlice.reducer;
addNewPost thunk를 전송 후 extraReducers를 통해 로딩 상태를 처리하지 않고 useState를 이용해 로딩 상태를 처리했다. addRequestStatus가 false 일 때는 버튼의 disabled를 활성화시켜 로딩 중임을 나타낸다.
// components/posts/PostForm.tsx
// 코드 생략
export default function PostForm({ isEditPage }: { isEditPage?: boolean }) {
  // 코드 생략
  const [addRequestStatus, setAddRequestStatus] = useState(true);
  const dispatch = useAppDispatch();
  const handlePostSave = async (e: React.FormEvent) => {
    e.preventDefault();
    if (title && content) {
      // 코드 생략
      try {
        setAddRequestStatus(false);
        await dispatch(addNewPost({ title, content, userId }));
        navigate('/');
      } finally {
        setAddRequestStatus(true);
      }
    }
  };